The Pedal Gee Bee
The ongoing saga of the construction of a pedal powered Gee Bee R2 replica for my kids.
Friday, August 12, 2005
Nose Plate Lamination & Firewall
Time spent: 2.5 hours (evening)
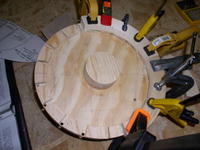
Glued up more of the nose plate pine rings. I should have all of them completed by the end of the weekend. I’m taking the glue-up slowly as I want this thing to be solid and round.
Unclamped the remaining wheel cover assembly. It looks like a mess but it’s VERY solid. I’ll be able to sand on these as if they were solid blocks of wood. I’m beginning to realize just how much sanding it will take to get these into their final shape. WOW. I’m going to need my respirator.
I temporarily reattached the lower fuselage assemblies in place in order to scribe the firewall shape. I simply drilled partially through the inside of the fuse and attached from the inside with 3 screws on each side. In the finishing process the holes will be filled by body putty. Clamped the firewall in the correct place and transferred the firewall hole centers to the nose positioning plate adapter with a center punch. I then drew the edge of the firewall around the parts of the fuselage that stick out (cowl formers and fuselage lower front corners). These places will be sanded to this line so that the cowl is sort of “set-off” from the rest of the aircraft.
Having completed the scribing of the firewall I proceeded to enlarge the 1/8th holes to 2 3/16ths and glued in the T-nuts. Remember, you want to get them well seated, and you don’t want to get glue inside the threads. I rummaged through my odds and ends bin and found a scrap bolt with the correct threads, turned the t-nut on and drove it like a nail for a few taps until it bit. Then I placed a little dollop of glue behind the t-nut and tapped it down. This way it gets fully seated in the hole, and the screw keeps the threads glue-free.

